Build a support inbox in Next.js (email in, tickets out)
Point support@yourdomain at MailKite, parse the inbound email to JSON, and POST it to a Next.js App Router Route Handler. Verify the signature against the raw body, create a ticket, and auto-reply. The whole loop, in working code.
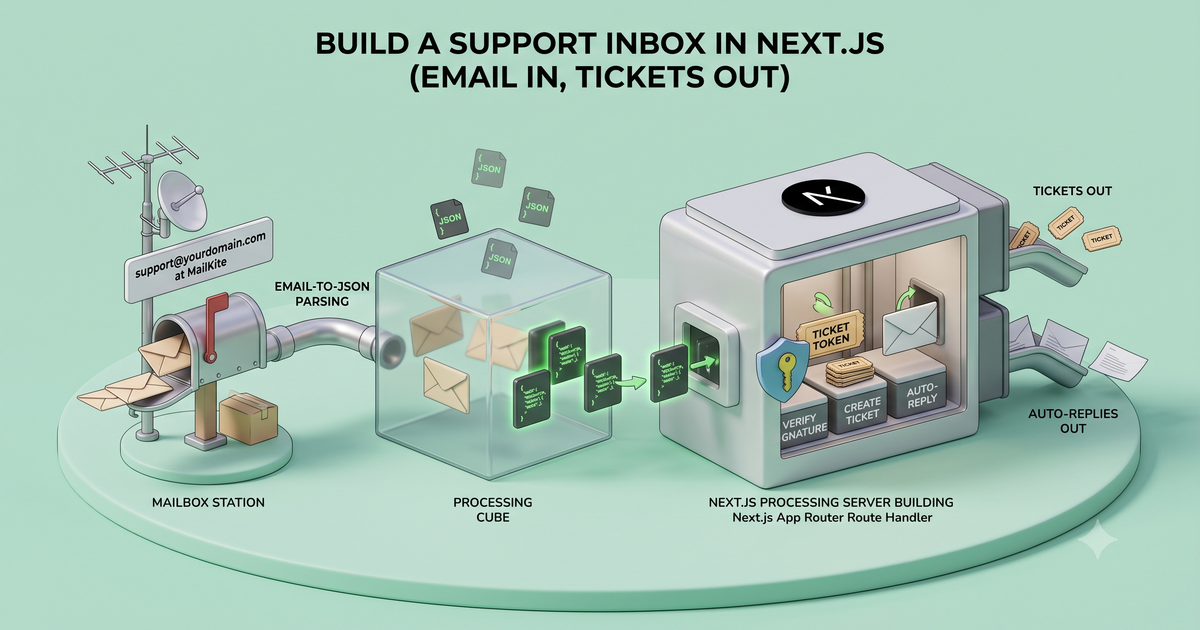
I’ve built this exact feature three times at three companies, and the first two times I did it the hard way: a mailbox, a poller, a MIME library, and a weekend I’d like back. Here’s the version I’d hand to anyone starting fresh in Next.js today. The path a support email takes is a straight line in, and a single reply back out:
Three moving parts: a customer emails support@yourdomain.com; MailKite receives it at the edge, parses the entire MIME tree, and POSTs one signed JSON webhook; your Route Handler verifies the signature, writes a ticket, and (if you want) fires a threaded auto-acknowledgement back. The only email-specific work is the work you’d do for any webhook: verify it’s real, then read the fields. Here’s that whole loop as one Route Handler, runnable as pasted on the App Router:
// app/api/hooks/mailkite/route.ts
import { NextRequest, NextResponse } from "next/server";
import { MailKite } from "mailkite";
import { createTicket } from "@/lib/tickets";

const SECRET = process.env.MAILKITE_WEBHOOK_SECRET!;
const mk = new MailKite(process.env.MAILKITE_API_KEY!);

export async function POST(req: NextRequest) {
  // Raw body, exactly as sent. The signature is an HMAC over these bytes,
  // so read the text FIRST, never req.json() before you verify.
  const raw = await req.text();
  const sig = req.headers.get("x-mailkite-signature");

  // One SDK call: recomputes the HMAC, constant-time compares, and rejects
  // anything outside the ±5-minute replay window.
  if (!MailKite.verifyWebhook(sig, raw, SECRET)) {
    return new NextResponse("bad signature", { status: 401 });
  }

  const event = JSON.parse(raw); // safe to parse now that the bytes are trusted
  if (event.type !== "email.received") {
    return NextResponse.json({ ok: true });
  }

  // Decide how much to trust the sender before you act on the mail.
  const trusted = event.auth?.spf === "pass" && event.auth?.dmarc === "pass";

  const ticket = await createTicket({
    fromAddress: event.from.address,
    subject: event.subject,
    body: event.text,
    html: event.html,
    threadId: event.threadId,     // groups replies into one conversation
    spam: event.auth?.spam,
    trusted,
    attachments: event.attachments ?? [], // each has a short-lived signed `url`
  });

  // Optional: auto-acknowledge. inReplyTo threads the reply back to the sender;
  // mk.send returns { id, status }.
  await mk.send({
    from: "support@myapp.ai",
    to: event.from.address,
    subject: `Re: ${event.subject}`,
    inReplyTo: event.threadId,
    html: `<p>Thanks, we've opened ticket #${ticket.id} and a human will reply shortly.</p>`,
  });

  return NextResponse.json({ ok: true }); // ack fast; heavy work goes out of band
}
That’s the whole loop: verify, create ticket, reply. There’s no GET to write, no polling service, no MIME parser in your node_modules. The rest of this post unpacks that handler so you know why each line is there before it bites you in production.
Inside the handler, top to bottom
Read the handler top to bottom and it’s six steps, and only one of them is email-specific. The order is load-bearing: the raw body has to be read and verified before anything is allowed to parse it.
Steps 1 and 2 are the ones people lose an afternoon to, and we’ll come back to them. First, the five-minute setup.
Point a domain at MailKite
npm install mailkiteAdd the MX record MailKite gives you, verify the domain, and set your webhook URL to https://yourapp.com/api/hooks/mailkite. Two secrets go in your environment: the webhook signing secret (to verify inbound) and an API key (to send replies).
# .env.local
MAILKITE_WEBHOOK_SECRET=whsec_…
MAILKITE_API_KEY=mk_live_…
What actually hits your webhook
Here’s the payload the handler above is reading. It’s the whole message, already parsed, so there’s no S3 round-trip and no MIME library in your dependency tree:
{
  "id": "msg_2Hk9…",
  "type": "email.received",
  "from": { "address": "ada@example.com" },
  "to": [{ "address": "support@myapp.ai" }],
  "subject": "Re: invoice #1042",
  "text": "Looks good, approved!",
  "html": "<p>Looks good, approved!</p>",
  "threadId": "<a1b2c3@mail.example.com>",
  "receivedAt": 1785196800000,
  "receivedAtIso": "2026-07-28T00:00:00.000Z",
  "auth": { "spf": "pass", "dkim": "pass", "dmarc": "pass", "spam": "ham" },
  "attachments": [
    {
      "id": "msg_2Hk9…:0",
      "filename": "po.pdf",
      "contentType": "application/pdf",
      "size": 18213,
      "url": "https://api.mailkite.dev/att/2Hk9…/0?exp=…&sig=…"
    }
  ]
}
Four things are already done for you by the time that lands:
The two rules that save you a debugging session
Two lines in that handler are where people lose the afternoon. The first is the order of operations.
await req.json() and re-stringifying to check the signature. JSON round-tripping reorders keys and changes whitespace, but the HMAC is computed over the exact bytes MailKite sent. Call await req.text() first, verify, then JSON.parse. App Router Route Handlers don't auto-parse the body, so text() hands you the untouched bytes as long as it's the first thing you read.Ack fast, work later. Return 200 as soon as the ticket is written. If you block the response on a slow AI summarizer or a flaky third-party API, senders retry and you get duplicate tickets. Push the slow work to a queue or a background function and let the webhook return immediately.
Threading: replies that reopen the same ticket
When Ada replies to your auto-acknowledgement, the next webhook carries the same threadId. Key your tickets on it and a back-and-forth collapses into one conversation instead of ten disconnected rows:
const existing = await findTicketByThread(event.threadId);
const ticket = existing
  ? await appendReply(existing.id, event.text)
  : await createTicket({ /* …as above */ });
That single field is the difference between an inbox and a pile of unrelated messages. Passing it back as inReplyTo on the reply (as the handler does) sets the outbound In-Reply-To header, so the sender’s mail client threads your acknowledgement under their original too.
If you’d rather not use MailKite
Full disclosure: we build MailKite, so treat this as the version we’d reach for. The webhook shape above isn’t unique to us, and the Route Handler you wrote doesn’t care what’s POSTing it:
- Postmark inbound gives you a similar parsed-JSON POST; it’s a solid choice if you’re already on their sending side.
- SES can receive, but it drops raw MIME in an S3 bucket and pings a Lambda you write, so you’re back to running a MIME parser (
mailparserand friends) and an IAM policy. Cheapest at volume, most assembly required. - Cloudflare Email Workers hand you the raw message at the edge with no parsing or routing layer, so you build the JSON shape yourself.
- The DIY path is the one I burned two weekends on: an IMAP mailbox, a poll loop, and a MIME library like
mailparseror Python’semail. It works, but you own the polling cadence, the reconnects, and every encoding edge case.
All of them terminate in the same handler. What MailKite saves you is the part before the webhook: the MX edge, the MIME parsing, the SPF/DKIM/DMARC checks in that auth block, and the signed-and-retried delivery. The receiving docs and webhook security cover the same flow for Python, Ruby, Go, PHP, and Java.
FAQ
Why await req.text() instead of req.json() in the Route Handler?
Webhook signatures are HMACs over the raw request body. If you parse to JSON and re-serialize, the bytes change and verification fails. Read the raw string with req.text(), run MailKite.verifyWebhook(sig, raw, SECRET), then JSON.parse(raw).
Do I need to disable Next.js body parsing?
No. App Router Route Handlers don’t auto-parse the body; you choose with req.text(), req.json(), or req.arrayBuffer(). Just make sure text()/arrayBuffer() is the first thing you read so the raw bytes are still available.
How do I stop spoofed emails from opening tickets?
Don’t trust the From: header, it’s plain text. Check the auth object (spf, dkim, dmarc, and the spam verdict) and decide how much to trust the sender. And always verify the webhook signature so you know the POST genuinely came from MailKite.
How do attachments arrive?
Not inline by default. Each is a short-lived signed url in the attachments array that you fetch on demand, so a 13 MB PDF never bloats your webhook body. Store the file or hand the URL straight to your storage layer.
Can the auto-reply count as the delivery?
For simple acknowledgements, mk.send() from your API key is the clearest path and gives you an id to log. MailKite also supports an inline reply ack if you’d rather answer straight from the webhook, see the receiving docs.
That’s a full support inbox: email in, tickets out, replies threaded, in one Route Handler. Point a domain at MailKite and send your first test email to support@, the webhook fires in seconds.
Related: Receiving email is the part nobody warns you about, on why inbound is the hard direction, and Receive email in Python if Django or FastAPI is your stack instead.